本文共 5159 字,大约阅读时间需要 17 分钟。

更改用户账户设置自动更改

Most of the default settings for your work fine. However, for full customization, you’re better off digging into the settings and changing some things around to meet your needs.
大多数默认设置都可以正常工作。 但是,对于完全自定义,最好是深入研究设置并更改一些内容以满足您的需求。
更改布防/撤防延迟 (Change the Arm/Disarm Delay)
Whenever you arm your security system, you have one minute (by default) before it actually locks in, which gives you time to leave and lock the door on your way out. Similarly, there’s also a delay whenever a sensor is tripped before the alarm starts sounding. You can adjust these delays in the settings.
每当您武装安全系统时,您实际上只有一分钟(默认情况下)才会真正锁定,这使您有时间离开并在出门时将门锁上。 同样,在警报响起之前,只要传感器跳闸,也会有一个延迟。 您可以在设置中调整这些延迟。
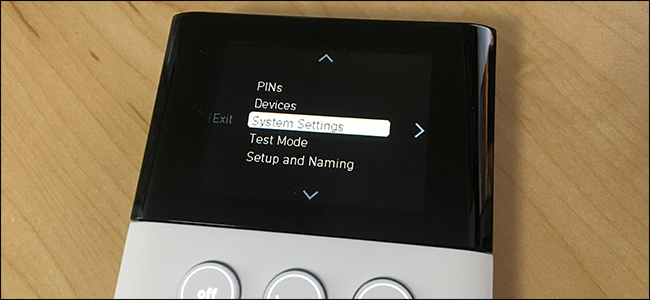
To do this, start by pressing the menu button on the keypad, keying in your master PIN, and then selecting “System Settings” from the list (it should already be highlighted).
为此,请先按键盘上的菜单按钮,键入主PIN,然后从列表中选择“系统设置”(它应该已经突出显示)。
Scroll down and you’ll see four different settings for the various delay types.
向下滚动,您会看到各种延迟类型的四种不同设置。

Here’s a breakdown of what each one means:
以下是每个含义的细分:
Exit Delay, Home: This how much time you have to exit your home after you’ve set the alarm to “Home” mode before the system officially arms. “Home” mode arms everything except for motion sensors.
离开家的延迟时间:将警报设置为“家”模式后,系统正式布防之前必须离开家的时间。 除运动传感器外,“ Home”模式可布防所有设备。
Exit Delay, Away: This how much time you have to exit your home after you’ve set the alarm to “Away” mode before the system officially arms.
离开延时离开:在系统正式布防之前,将警报设置为“离开”模式后,您必须离开房屋的时间。
Entry Delay, Home: This is how much time you have after arriving home to disarm your system before the alarm sounds.
进入家中的延迟时间:这是您回家后有多少时间才能在警报响起之前撤防系统。
Entry Delay, Away: This is how much time you have after arriving home to disarm your system before the alarm sounds.
进入延迟时间:这是您回家后有多少时间在警报响起之前撤防系统。
Select the delay you want to change, and then press the “Edit” command to the selection’s right. From there, you can use the keypad to enter in a time in minutes and seconds. When you’re done, press the “Set” command on the right side of the screen.
选择要更改的延迟,然后按选项右侧的“编辑”命令。 从那里,您可以使用键盘以分钟和秒为单位输入时间。 完成后,按屏幕右侧的“设置”命令。

Keep in mind that there are minimums for the Exit and Entry Delay in Away mode—45 seconds and 30 seconds, respectively.
请记住,“离开”模式下的“退出”和“进入延迟”有最小值,分别为45秒和30秒。
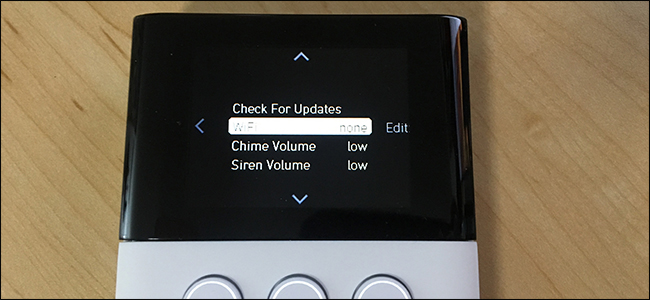
将Wi-Fi添加为备份连接 (Add Wi-Fi as a Backup Connection)
Your SimpliSafe system automatically uses cellular to connect to the monitoring services (assuming you pay for that plan), but if the SimpliSafe ever loses the cellular signal, it can use Wi-Fi as a backup connection.
您的SimpliSafe系统会自动使用蜂窝网络连接到监视服务(假设您为该计划付费),但是如果SimpliSafe丢失了蜂窝网络信号,则可以使用Wi-Fi作为备用连接。
Just go into System Settings and select the “WiFi” entry.
只需进入系统设置,然后选择“ WiFi”条目。
Choose your Wi-Fi network and press the “Use” command on the right side of the screen.
选择您的Wi-Fi网络,然后按屏幕右侧的“使用”命令。

Type in the password using the keypad and then hit the “Go” command.
使用键盘输入密码,然后点击“执行”命令。

Give it a moment to connect, and after a few seconds you’ll be all set to go.
给它一个连接的时间,几秒钟后,您将准备就绪。
设置胁迫密码 (Set Up a Duress PIN)
You obviously already have a master PIN set up to arm and disarm your system, as well as access settings. You can also set up a duress PIN, which is a special number you can enter if you’re forced to key in your PIN under duress. The duress PIN quietly dispatches authorities to your home.
显然,您已经设置了一个主PIN,用于布防和撤防系统以及访问设置。 您还可以设置胁迫PIN,如果您被迫在胁迫下键入PIN,则可以输入一个特殊数字。 胁迫的PIN悄悄将当局派到您家中。
Go into the menu on your keypad and select the “PINs” entry.
进入键盘上的菜单,然后选择“ PINs”条目。

Then choose the “Add Duress PIN” option.
然后选择“添加胁迫密码”选项。

You’ll get a brief summary of what it’s meant to do. Continue on by pressing the right arrow.
您将简要了解其用途。 继续按右箭头。

From there, enter in your unique duress PIN.
从那里输入您唯一的胁迫PIN。

调整提示音和警报音量 (Adjust the Chime and Alarm Volumes)
Your base station makes a few different sounds. There’s a chime noise whenever a sensor is triggered while the system is disarmed. There’s a siren noise when a sensor is triggered while the system is armed. And then there are voice prompts. You can adjust the volume independently for each of these.
您的基站发出几种不同的声音。 撤防系统时,只要触发传感器,就会发出提示音。 系统布防时触发传感器会发出警笛声。 然后有语音提示。 您可以单独调节每个音量。
Jump into the menu and then into System Settings. Scroll down a bit and you’ll see the options for the volume adjustments.
跳至菜单,然后进入系统设置。 向下滚动一点,您将看到音量调节的选项。
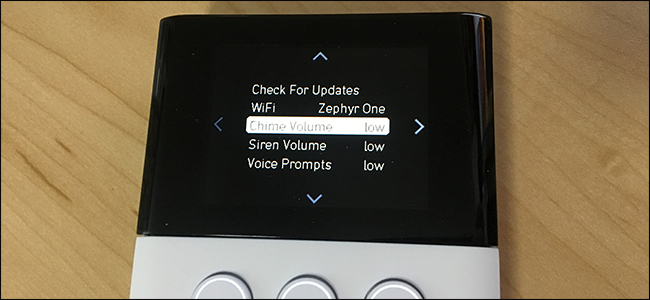
Each setting has four volume levels to choose from: Low, Medium, High, and Off. Choose one for each setting, but it’s probably not a good idea to select “Off” for the siren noise.
每个设置都有四个音量级别可供选择:低,中,高和关。 为每个设置选择一个,但是将警笛噪声选择为“关”可能不是一个好主意。

调整警笛持续时间 (Adjust the Siren Duration)
By default, the siren blares for four minutes before shutting off. For some users, this may be overkill, and you can change that duration in the settings.
默认情况下,警笛在关闭前会鸣叫四分钟。 对于某些用户而言,这可能是过大的,您可以在设置中更改该持续时间。
Head into System Settings, scroll down, and then select the “Siren Duration” option.
进入系统设置,向下滚动,然后选择“警笛持续时间”选项。
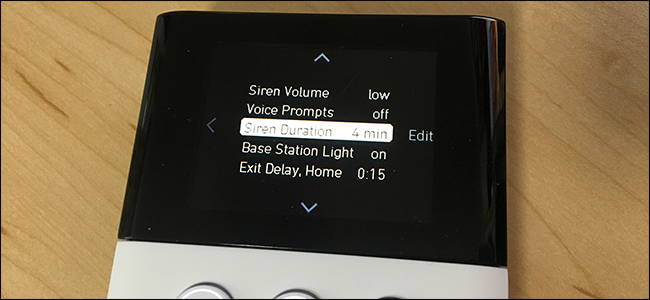
From there, you can select a new duration in 30-second increments. The shortest duration you can choose is 30 seconds and the longest is eight minutes.
在此处,您可以30秒为增量选择一个新的持续时间。 您可以选择的最短持续时间为30秒,最长为8分钟。
翻译自:
更改用户账户设置自动更改
转载地址:http://wfuwd.baihongyu.com/